Check out our discord at https://discord.gg/3u69jMa
Hardware Shaders
Note: This is not a guide for the shading assembly language in general. You can find official documentation at Microsoft ASM Shader Reference.
Republic Commando can use VS 1.1 and PS 1.1 to PS 1.4, so make sure you use the correct instructions for the version you want to use.
Creating a new HardwareShader
A HardwareShader is a built-in material class and a new one can be created via the texture browser. Note that this might crash UnrealEd unless you have applied either of the following fixes:
- Install the Republic Commando Fix
- Edit the properties of the HardwareShader class
- Go to the Actor class browser and uncheck
Use \"Actor\" as Parent?andPlaceable classes Only? - Go to
Object -> Material -> RenderedMaterial -> HardwareShaderand open its properties - Insert the following for the
VertexShaderTextandPixelShaderTextproperties (Edit them via the...button and hit Apply):- VertexShaderText:
vs.1.1
mov oPos, v0 - PixelShaderText:
ps.1.1
mov r0, c0
- VertexShaderText:
- Go to the Actor class browser and uncheck
Now you are ready to create a new shader object:
- Go to the texture browser and select
File -> New... - Fill in the Package, Group and Name fields
- For the MaterialClass select
HardwareShaderfrom the list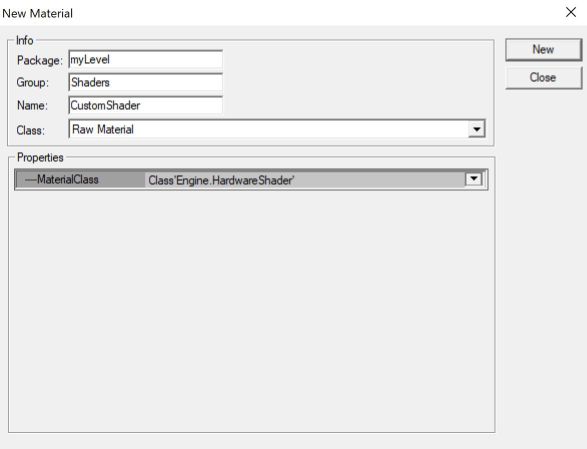

- Click on
Newand the properties window for the new material will appear. (You can ignore the error at the bottom)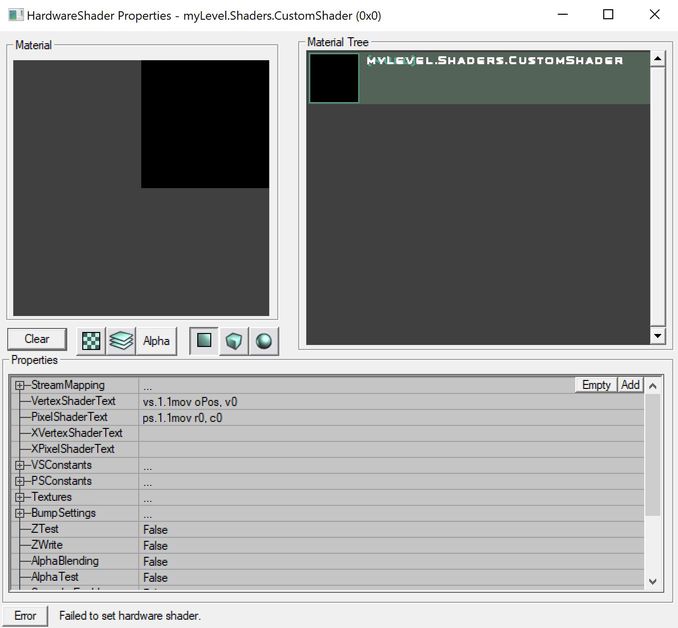

- Depending on what kind of shader you are creating you might want to set
ZTestandZWritetotrueas they are not set by default.
Writing Shader Code
Before you start editing the shader code, it is a good idea to open the Editor log window as errors will appear there.
First you should add the vertex inputs you need to the StreamMapping array. Usually you want the vertex position at the very least so add a new entry and it will be set to FVF_Position by default. The dropdown here is hidden by the insert button so to change the value of the entry just double click it. You can reference those inputs with the v0, v1... registers in the vertex shader.
Other user-defined inputs are passed to the shader with the VSConstants and PSConstants properties. They are arrays where each element defines the type of the constant and four float values (X, Y, Z, W) that are used only if the type of the constant is EVC_MaterialDefined. These values can also be changed in UnrealScript or C++ code so the inputs can be made dynamic.
One important point to note is that all matrix constants (identifiable by their name) take up four slots. This means after a matrix constant you should leave three entries that are set to EVC_Unused. The reason is that each slot has four values but a 4x4 matrix needs 16.
Constants are referenced with c0, c1... in the shader code. There is also the def instruction to create constants in the shader source but that can't be used and will lead to compile errors since the constants are supplied via the arrays.
When editing shader code, it makes sense to place an object in the map and assign the shader as its skin so you can view the changes as you are editing. The shader updates each time you hit Apply in the text editor.
The following shader simply transforms the model to view space and draws it with a texture that is set to the first element of the Textures array in the shader properties:

- VertexShaderText:
vs.1.1
m4x4 oPos, v0, c0  ;Multiply the vertex position with the transformation matrix and write it to oPos
mov oT0, v1        ;Pass through the texture coordinate
- PixelShaderText:
ps.1.4
texld r0, t0  ;Write texture 0 to r0 (t0 is the texture coordinate, the texture index is based on the destination register r0)