Check out our discord at https://discord.gg/3u69jMa
Triggers and ScriptedTriggers: Difference between revisions
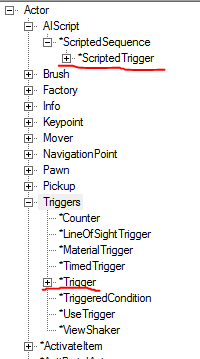
Created page with "The purpose of a Trigger is to let some action happen when it gets triggered. (captain obvious) So what we need for our map, is a Trigger, which will be activated/triggered when the player walks in and a ScriptedTrigger to make the action happen. Trigger1.PNG Place both actors on your map where the action should be going on. To keep the map nice and clean, it's recommended to put the Trigger and ScriptedTrigger right next to each other so it won't be a mess when you..." |
No edit summary |
||
| Line 3: | Line 3: | ||
So what we need for our map, is a Trigger, which will be activated/triggered when the player walks in and a ScriptedTrigger to make the action happen. | So what we need for our map, is a Trigger, which will be activated/triggered when the player walks in and a ScriptedTrigger to make the action happen. | ||
[[File:Trigger1.PNG]] | |||
Place the trigger on your map where it should get triggered. | |||
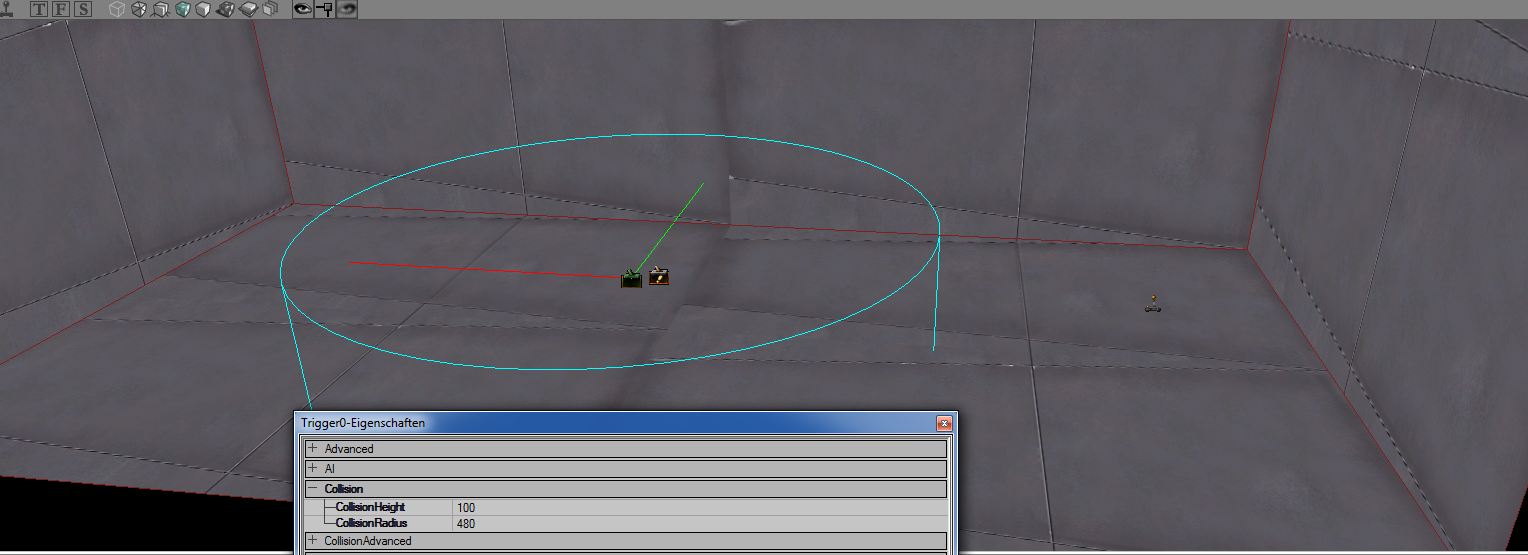
Open up the properties of the trigger and change the colission radius width and height to fit your map/room. Remember the action will be triggered when the player touches/walks in the radius of that Trigger. | |||
[[File:Trigger2.PNG]] | |||
Trigger2.PNG | |||
While having the properties window open for the Trigger, head to the Events tab and enter an event name. This example will use the event name "tutorial". | While having the properties window open for the Trigger, head to the Events tab and enter an event name. This example will use the event name "tutorial". | ||
[[File:Trigger3.PNG]] | |||
Trigger3.PNG | |||
Now when the player walks into the trigger | Now when the player walks into the trigger radius, an event with the name "tutorial" will trigger. To let the actual action happen, we need a ScriptedTrigger. So open up the actor window and navigate to Actor -> AIScript -> ScriptedSequence -> ScriptedTrigger and place it next to the normal trigger. | ||
To keep the map nice and clean, it's recommended to put the Trigger and ScriptedTrigger right next to each other so it won't be a mess when you place lots of them. | |||
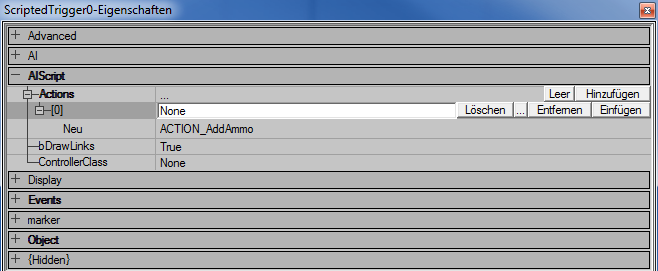
Open properties window and go to the AIScript category. Click on the plus icon in the Actions section. You are now able to to add a new action by clicking on the "Add" button on the right border of the window. | |||
[[File:Trigger4.PNG]] | |||
After adding a new action, we have to select a specific one which is called "ACTION_WaitForEvent". So open up the drop down menu by clicking on ACTION_AddAmmo and select WaitForEvent. (Right on the bottom) After that, click on "New". We tell the action chain to wait for a certain event to trigger. | |||
Trigger5.PNG | [[File:Trigger5.PNG]] | ||
| Line 36: | Line 35: | ||
To sum up everything so far, we created a | To sum up everything so far, we created a trigger with a specific event name. It gets triggered when the player steps into the radius. The ScriptedTrigger has an action called "WaitForEvent", which then gets activated when the trigger gets activated. The rest of the action gets handled by the ScriptedTrigger. | ||
So we have a ScriptedTrigger ready to do some action, the actual process of the actions is the same now. You minimize the first Actions tab "[0]" by clicking on the minus and click on "Add" to add a new tab for the actions. | So we have a ScriptedTrigger ready to do some action, the actual process of the actions is the same now. You minimize the first Actions tab "[0]" by clicking on the minus and click on "Add" to add a new tab for the actions. | ||
For a list of detailed actions, see below. | |||
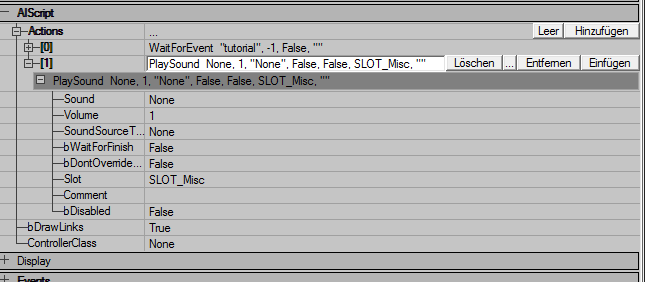
For this tutorial we will be using PlaySound action. | |||
Trigger6.PNG | [[File:Trigger6.PNG]] | ||
To add the actual sound, go to the sound browser and select a sound you want to use. Go back to the ScriptedTrigger, click in the Sound field and click on "Use" button on right side of the properties window. The ScriptedTrigger adds the sound automatically to the field. | To add the actual sound, go to the sound browser and select a sound you want to use. Go back to the ScriptedTrigger, click in the Sound field and click on "Use" button on right side of the properties window. The ScriptedTrigger adds the sound automatically to the field. | ||
This "PlaySound" action got some additional parameters, for example Volume and bWaitForFinish. While Volume is self explaining, bWaitForFinish is being used to halt the action flow until the sound finished | This "PlaySound" action got some additional parameters, for example Volume and bWaitForFinish. While Volume is self explaining, bWaitForFinish is being used to halt the action flow until the sound finished playing, so setting this value to true will wait until the sound is done playing and afterwards continue with the action flow. | ||
Revision as of 19:11, 1 August 2024
The purpose of a Trigger is to let some action happen when it gets triggered. (captain obvious)
So what we need for our map, is a Trigger, which will be activated/triggered when the player walks in and a ScriptedTrigger to make the action happen.
Place the trigger on your map where it should get triggered.
Open up the properties of the trigger and change the colission radius width and height to fit your map/room. Remember the action will be triggered when the player touches/walks in the radius of that Trigger.
While having the properties window open for the Trigger, head to the Events tab and enter an event name. This example will use the event name "tutorial".
Now when the player walks into the trigger radius, an event with the name "tutorial" will trigger. To let the actual action happen, we need a ScriptedTrigger. So open up the actor window and navigate to Actor -> AIScript -> ScriptedSequence -> ScriptedTrigger and place it next to the normal trigger.
To keep the map nice and clean, it's recommended to put the Trigger and ScriptedTrigger right next to each other so it won't be a mess when you place lots of them.
Open properties window and go to the AIScript category. Click on the plus icon in the Actions section. You are now able to to add a new action by clicking on the "Add" button on the right border of the window.
After adding a new action, we have to select a specific one which is called "ACTION_WaitForEvent". So open up the drop down menu by clicking on ACTION_AddAmmo and select WaitForEvent. (Right on the bottom) After that, click on "New". We tell the action chain to wait for a certain event to trigger.
For ExternalEvent, add the event name of the Trigger which is "tutorial" in this case. The ScriptedTrigger waits until an event with this exact name is getting triggered.
To sum up everything so far, we created a trigger with a specific event name. It gets triggered when the player steps into the radius. The ScriptedTrigger has an action called "WaitForEvent", which then gets activated when the trigger gets activated. The rest of the action gets handled by the ScriptedTrigger.
So we have a ScriptedTrigger ready to do some action, the actual process of the actions is the same now. You minimize the first Actions tab "[0]" by clicking on the minus and click on "Add" to add a new tab for the actions.
For a list of detailed actions, see below. For this tutorial we will be using PlaySound action.
To add the actual sound, go to the sound browser and select a sound you want to use. Go back to the ScriptedTrigger, click in the Sound field and click on "Use" button on right side of the properties window. The ScriptedTrigger adds the sound automatically to the field.
This "PlaySound" action got some additional parameters, for example Volume and bWaitForFinish. While Volume is self explaining, bWaitForFinish is being used to halt the action flow until the sound finished playing, so setting this value to true will wait until the sound is done playing and afterwards continue with the action flow.
Important
A Trigger can activate one or more ScriptedTriggers at the same time if the event name is the same.
One or more Triggers can activate one ScriptedTrigger when the event name is the same.
                 |------- ScriptedTrigger0
Trigger0 --------|
                 |------- ScriptedTrigger1


Trigger0 --------|
                 |------- ScriptedTrigger0
Trigger1 --------|


